By the way, that is not Adam. That is our friend Kelly. He is a carpenter and was nice enough to come help us Adam.
Aidan wanted to help as well.
I don't have a close up picture right now, but as far as the cutting went, the most difficult part was cutting it out to fit perfectly on top of the existing base board.
Actually cutting the wood and nailing it to the wall only took about 5 hours once we got all the wood here.{we ended up having to buy from 6 different Lowe's}
The worst part was once it was up, it all had to be caulked, then sanded in areas and painted. Adam and I originally talked about hiring someone to do all of this but once Kelly left Friday night, we were really anxious to see the finished project so we put Aidan to bed and stayed up until 6am working on it until it was finished.
I really have to Thank Adam so much for executing this idea for me. I am pretty creative and can do a lot of things on my own but using the saw and nail gun are not my thing. I couldn't have done it without him and he worked so hard to get it done and we both love it.
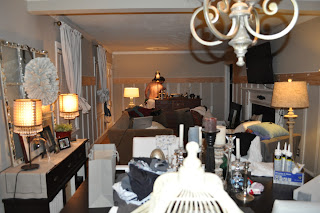
See? Doesn't it look awesome?
That is my Nana's chair I have been talking about. I am finally making the slip cover! Although it's not going really well so I may just have it reupholstered in this fabric. That is the most comfortable wing back chair and it has a lot of memories for me so I'm glad we can keep it in this room.
I also finally decided on this chandelier and will FINALLY be ordering this cabinet for the far wall. Took long enough didn't it? I knew I wanted to get all this finished before bringing such a big piece in.
I did not realize how dark it was before.
I still have a long way to go until I am finished with the room
and at a place where I am totally happy with it. I am waiting to get some more things hung up and I am so ready for the chair to be done. The pillows on my sofa are the covers I
typically put on the sofa in the colder months but my mother is borrowing my pillow covers that I use this time of year to stage her house for sale right now. So red works.
Board and Batten Info:
I took some tips from this tutorial . We used an 8" board for the horizontal "board". We cut it and nailed it up first. It is hung 65" from the floor. Next we cut the wood {mdf}for the "ledge" . We used the same size wood there as we did for the "battens" which is 2 1/2". It is sold in 10' sections and you have to special order it. Once that was cut we nailed it on top of the board. Voila a ledge was born.
Next up, we measured all the way around the room to determine how many battens we were going to need to cut. We spaced ours 12" apart. In some spots we had to do 11" because we needed them to be centered. You will figure that out as you go along. i.e. You want your battens centered under your windows. Sometimes this means adjustments.
We bought a tiny piece of the moulding that sits on our baseboard at Lowe's so that we could trace the shape on to the bottom of the battens making it easier to cut so it would fit perfectly on the baseboard. We used a jig saw for that. We nailed them all up and that was it! Pretty simple. I say it was simple but I have to tell the truth. I DID NOTHING. I just watched and micro managed which was annoying. They guys did an awesome job. The total cost of the project for wood, mdf, finish nails, caulk {we used 6 tubes}, and the paint we spent around $350. If you use real wood it is going to cost you double if not more. We chose the MDF because when you paint it, you can't tell the difference. We used wood on the top because we couldn't find a piece of MDF in that width.
Sorry this post got a little bit long. If you want to try this at your house and want to ask some questions we are more than happy to help. Just ask!
I am linking up with the DIY Showoff!!!
Check it out for some GREAT DIY ideas!!!
Lastly, Can y'all show me some love and Follow this blog? All you have to do is click FOLLOW in the right side bar! Thanks so much!









3 comments:
Your board and batten looks amazing!! Great job!! We did that, too! Come check ours out. :)
I wish I could have you down to come decorate my house! Everything you do always looks amazing...wish I was as creative/good at decorating as you are!
yep... me too! i wish you would come help me decorate? have you thought more about my offer?!
Post a Comment